|
BBDS Design Audio
Getting your Trinity Audio player ready...
|
A website maintenance plan is a schedule to backup and update your site, check your site's health, and scan for malware or intrusions. If your site is powered by WordPress, the rapid pace of security fixes and new feature implementations makes it imperative to stay up-to-date. WordPress has made the updating process easy to accomplish from the admin panel, but always backup your database and essential WordPress files first. Updates are typically smooth, but when they go south they can take down your site and can be difficult and expensive to resolve without a backup. If you are technophobic, one solution is to subscribe to our monthly website maintenance plan. We take care of everything and you can rest easy, and the billing is handled automatically via credit card subscription.
Outlined below are the preliminary steps in backing up your files and database that you need to take before updating your site. You can do it if you pay attention to the details, but the ease of doing so really depends on how your hosting provider has implemented the required functionality. This is literally all over the map, so again you may prefer to leave the details in more experienced hands. If you want to get your hands dirty, keep reading.
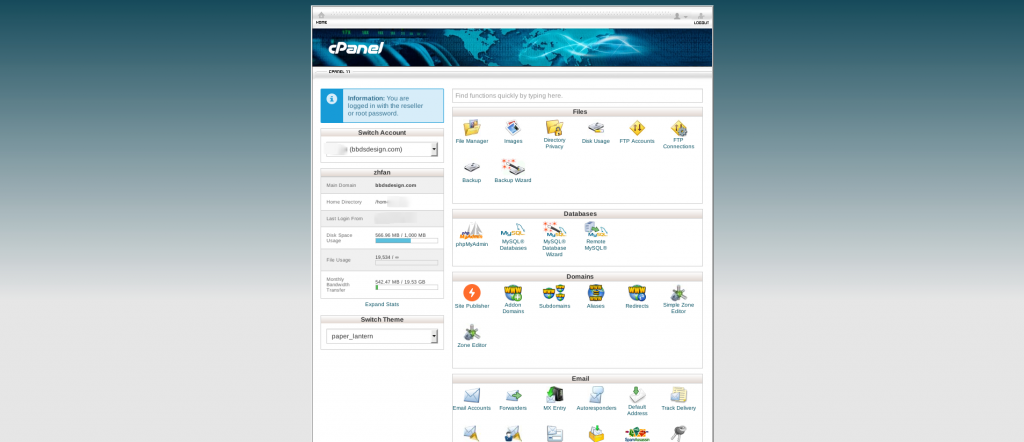
If you want to handle it yourself the details depend on the interface implemented by your hosting provider. At a bare minimum you will need some sort of file system access via FTP, and an interface to your site's database. We really like hosts that provide the cPanel interface, which is a full suite of hosting functions in a nicely laid out graphical interface. See the figure for an example.
As you can see in the screenshot, the interface is divided by panels of related functions: Files, Database, Domains, Email, Metrics, Security, Software, Advanced, Preferences and an Apps Installer. The graphical appearance, the functions included, and the panel layout can be customized by the hosting company to differentiate their product offering. The Softaculous App Installer, which allows one click installs of popular hosting software like WordPress, Joomla, Drupal (and hundreds of other applications), costs the hosting company an additional licensing fee and may not be offered. Our hosting plans all include a cPanel interface.
Many hosting companies forgo the cPanel interface to avoid the licensing fee and create their own interface. We have used dozens of different interfaces. The learning curve can be steep and some interfaces are far more intuitive than others. You need to
- create an FTP account, or access the FTP account that was created with your hosting account,
- access the DB admin interface, typically phpMyAdmin, to export a snapshot of your database.
- Backup your files with FTP:
- Put your FTP account parameters in your preferred FTP client program (we recommend the free FileZilla program available for Windows, Linux and Mac).
- Within your backup hard drive (your local computer), copy your last backup folder to a new folder and label it with the date. You want multiple copies in case you are hacked at some point - you do not want to copy over good files with ones infected with malware.
- Connect to your hosting account, navigate to the web hosting folder (often public_html or www, but this is variable), and download:
- wp-content folder
- .htaccess
- wp-config.php
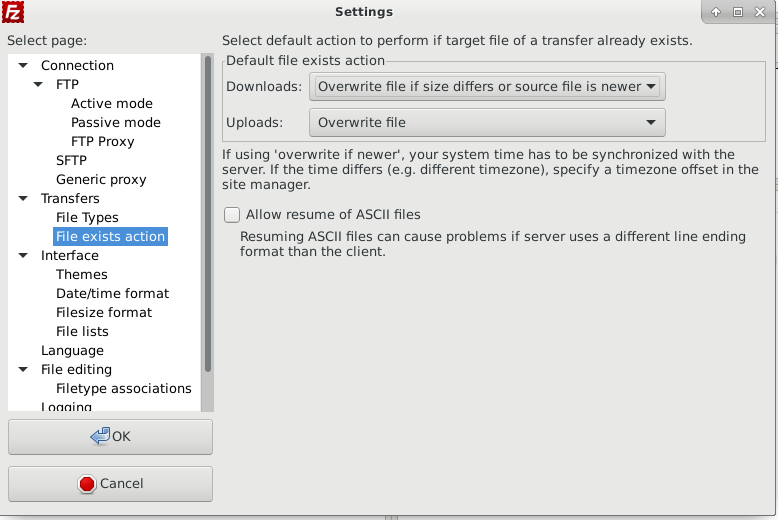
- If you want to speed this up, set your FTP client to only download files that have a newer file modification date or different size. In FileZilla you do that in the Edit - Settings menu, Connection - Transfers - File exists action - Downloads: Overwrite file if size differs or source file is newer. This setting will skip downloading files if they have not changed. Again, this is host dependent and will not work on all hosts. Appearance of this screen will vary by FileZilla version and OS.
- Export a snapshot of your database using phpMyAdmin.
-
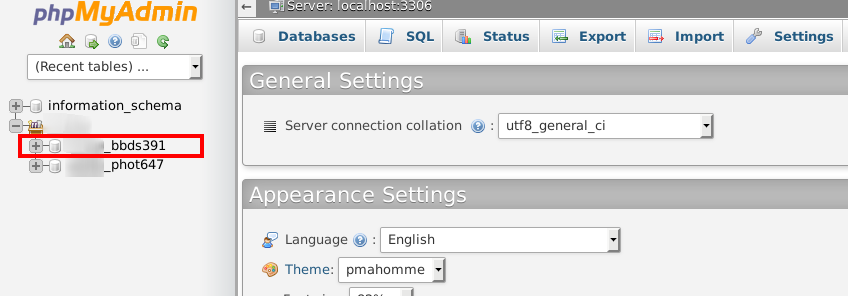
- Select the database
-
- Expand the database to show the tables.
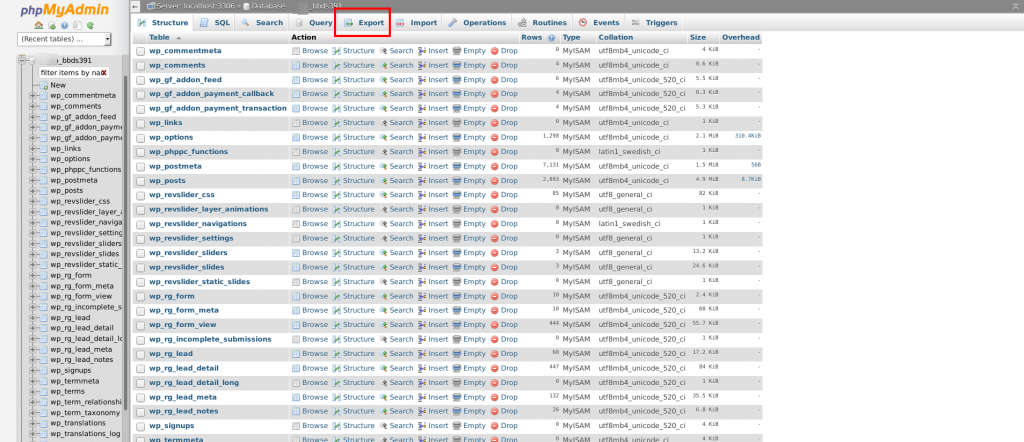
- Export the database - choose custom and compression - gzipped
- Save the compressed database file.
When you download and save the compressed file, change the file name to make it meaningful and unique. Dating the file name in your chosen format is a useful way to archive your database backups. Keep the first part of the file name intact as it is the database name. In a complex hosting account you may have multiple databases and corresponding backups, and you need to keep them straight. I would rename a file such as drwp539.sql.gz to drwp539-5.8.17.sql.gz and store it in the backup folder for that account. That is my preferred date format because I prefer not to have to decode a date, but you can get inner geek on and use a unix timestamp, like drwp539-1494201600.sql.gz.
How many backups you keep depends in part on how frequently you update or add new material to your site. Backup at least once a month and perhaps daily, especially if you post daily. A SQL backup file compresses about 10-fold or more as it is a text file of instructions to reconstitute the database, and text is highly compressible. So you can save many database backups if you need to.
Of course frequent backups done manually will become tiresome. So you want to automate this as much as possible. Yes, there are WordPress plugins that do this, but you want to thoroughly investigate the details of the plugin you employ. Does it use a non-standard format or proprietary format? Does it compress the database backup using its own, closed source algorithm? Does it make you buy a pro version if your backup reaches a certain size? These are scenarios from real world backup products that will be compared in another post. A simple way to check the usefulness of your backup is to reimport it (into a blank database) with another tool like phpMyAdmin, or the command line if you are so inclined. If this process throws errors you know the database backup is non-standard. That usually means you have to use the same plugin to install the backup, which may well lead to a catch-22 conundrum. You can't install the database backup without a working WordPress instance, but you may be trying to use the database backup to fix a broken website. You need to figure this out before committing to a backup plugin or backup strategy.
One backup plugin I have used a fair amount is BackWPup, but I recommend it only with reservations. It is easy and straightforward to setup, but it does add text to the .sql file that makes it non-standard. You can edit these additional lines in a text editor, but it is frustrating and is not something I would recommend when in full panic mode, like when you are attempting to fix a crashed website.
Those considerations are the reason I have outlined the phpMyAdmin export/import method. It produces a standard SQL file and it does not require a working website to import. Most hosts provide phpMyAdmin, although how you navigate to it is host-dependent. That is why I highly recommend cPanel hosting accounts for their usable, standardized interface with a comprehensive tool suite in one place, organized by function. No navigation required, which is a lesson all interface designers for hosting companies should take to heart.
You do not need to need to make file backups as often, or save as many of them.
- For WordPress sites, you only need backup wp-config.php, .htaccess, and wp-content.
- If you have a caching plugin, do not backup the cached files - they are not useful or required.
- Don't use a backup plugin to backup files, especially with shared hosting. This almost never works for me. Use FTP instead.
- Store the file backups outside of the hosting account file system.
Site maintenance is crucial and can save your site if it gets hacked or goes down. (Or you press the right button at the wrong time. It happens.) This is something you can do, but may prefer not to do it yourself. If you choose a backup plugin, be sure to check it thoroughly under real world worst case conditions.


